After a lengthy hiatus, caused in part by the exam period and job searching, CratePusher is back in full force! In this installment I outline my efforts in polishing up the gameplay with some moderately flashy animations and transitions, using techniques such as input buffering, sprite cycling and animation curves.
Following directions
The first thing that comes to mind when looking at the state of affairs at the end of part 2 is that the player character is very static. The factory worker seems unfazed by the player’s choice of directions.
As the spritesheet I’m working with has directional player sprites, it seems like a waste not to use them — having the player sprite face different directions while moving around the level comes at a very small cost. Additionally, the direction changes will be helpful to the player when retracing their steps and correcting their errors, as they provide context to what move was made before the last one.
Before I proceed with the implementation, I need some extra tiles I hadn’t used until now, so I define their numbers in the TileType enumeration:
public enum TileType
{
    // ...
    PlayerDown          =  65,
    PlayerDownWalk1     =  66,
    PlayerDownWalk2     =  67,
    PlayerUp            =  68,
    PlayerUpWalk1       =  69,
    PlayerUpWalk2       =  70,
    // ...
    PlayerRight         =  91,
    PlayerRightWalk1    =  92,
    PlayerRightWalk2    =  93,
    PlayerLeft          =  94,
    PlayerLeftWalk1     =  95,
    PlayerLeftWalk2     =  96,
    // ...
}
Once that is done, as is tradition, I continue with a definition of another enumeration type:
public enum Direction
{
    Left,
    Right,
    Up,
    Down
}
Aside: Being DRY The introduction of another enumeration type may seem suspect, especially when both existing enumeration classes (
TileTypeandInputAction) already have direction-related values. It might be argued that this violates one of the common good practices in programming, summarized in the phrase Don’t Repeat Yourself (often shortened to just DRY).In my view this is not the case. When I used Haskell for a short while, the language strongly encouraged defining separate algebraic data types and aliasing for specific applications. For instance, you could define two aliases for the
Stringtype:
- one where the string represents an
URL,- and one where the string represents a
Postcode.Even though both those aliased types are just strings underneath, they are not interchangeable, so using an
URLwhere aPostcodeis required results in a type error. This is an instance of leveraging the type system to ensure that the program is correct.I see this as a similar case. Note that the other enumerations have extra values, that are not valid (and don’t really make sense) in this case. Therefore making
Directiona separate type now makes it impossible to mistakenly try to use a tile type that is not supported, by way of causing compilation failure.(Well, unless you perform a cast — but that is ugly and you deserve the errors that will appear if you do cast.)
Having defined the principal directions, I modify the level data model to keep track of the direction the player should be facing:
public class Level
{
    public Direction PlayerDirection { get; set; }

    public Level(IList<string> rows)
    {
        // ...
        PlayerDirection = Direction.Down;
        // ...
    }
}
Starting facing down seems natural, as the sprite facing down shows all of the characteristic features of the player character. Now that the property is available, it can be utilised in the player movement command:
public class MovePlayerCommand : ICommand
{
    private readonly Direction initialDirection;
    private readonly Direction finalDirection;

    internal MovePlayerCommand(Level level, InputAction inputAction)
    {
        // ...
        this.initialDirection = level.PlayerDirection;
        this.inputAction = inputAction;
        switch (inputAction)
        {
            case InputAction.MoveLeft:
                destinationPoint.X -= 1;
                finalDirection = Direction.Left;
                break;
            case InputAction.MoveRight:
                destinationPoint.X += 1;
                finalDirection = Direction.Right;
                break;
            case InputAction.MoveUp:
                destinationPoint.Y -= 1;
                finalDirection = Direction.Up;
                break;
            case InputAction.MoveDown:
                destinationPoint.Y += 1;
                finalDirection = Direction.Down;
                break;
        }
        // ...
    }

    public ICollection<ICommand> Execute(Level level)
    {
        // ...
        level.PlayerDirection = finalDirection;
    }

    public void Rollback(Level level)
    {
        // ...
        level.PlayerDirection = initialDirection;
    }
}
Note that I am saving the previous direction in the command, and restore it when rolling the command back. This creates the effect of retracing the player’s steps when performing consecutive undo actions on the game board.
An additional side effect, caused by the design of the command mechanism, is that when trying to walk in a direction that is not permitted (for example, trying to go into a wall) will not cause the player sprite to change the direction it is facing. This can be used to indicate to a player, which moves are valid and have an effect, and which do not.
The only thing left is to display the direction stored using the renderer:
private void DrawPlayer(Level level, SpriteBatch spriteBatch, Point offset, int targetTileSize)
{
    var playerLocation = TileToScreen(level.PlayerPosition, targetTileSize, offset);
    switch (level.PlayerDirection)
    {
        case Direction.Left:
            tileSheet.DrawTile(spriteBatch, TileType.PlayerFacingLeft, playerLocation, targetTileSize);
            break;
        case Direction.Right:
            tileSheet.DrawTile(spriteBatch, TileType.PlayerFacingRight, playerLocation, targetTileSize);
            break;
        case Direction.Up:
            tileSheet.DrawTile(spriteBatch, TileType.PlayerFacingUp, playerLocation, targetTileSize);
            break;
        case Direction.Down:
            tileSheet.DrawTile(spriteBatch, TileType.PlayerFacingDown, playerLocation, targetTileSize);
            break;
    }
}
Continued: Being DRY You can see that the decision to introduce a separate type has led to some verbosity. As usual, this is a trade-off — I’d rather have confidence in this part being correct than being efficient.
Adding fluidity to player actions
Having dealt with the easiest of all possible improvements, it’s time to address another issue. The player movement is instantaneous, which may be efficient and quick, but it is not very easy on the eye at all. To make the game more visually appealing, I will be aiming to use simple animations to smooth out the choppiness the previous versions had.
Transitioning out of the discrete data model
Thus far, I have performed all operations on a discrete level grid. This was convenient for multiple reasons, and was simple enough to deal with. However, the nature of the level’s representation meant that there was no easy way to represent animations.
Fractional numbers are required to proceed, so it’s time to convert our good old Points to fractional Vector2s:
public class Level
{
    public bool[,] Floor { get; }
    public HashSet<Vector2> Walls { get; }
    public HashSet<Vector2> Goals { get; }
    public HashSet<Vector2> Crates { get; }
    public Vector2 PlayerPosition { get; set; }
}
(As not to bore you with unnecesary listings, I have provided just one example of such conversion; the same had to be done to commands and the renderer.)
Frame rate and interpolation
So far, when moving any objects on the level, I was only concerned with the start and end of the movement. Any commands instantaneously moved the target object from their position to the destination. From now on, to get a smoother transition, I will be interpolating the intermediate positions of the objects.
In short, interpolation is a way of producing new data in between known, discrete data points. In our case, I have the initial and destination positions, and based on those, I will calculate the intermediate position in each frame based on the time elapsed since the start of the animation.
Aside: Frame rate woes As an alternate solution, let’s consider the following method. Assume that our animation shall always take 60 frames. In that case, I can take the difference between the ending and starting position (as a vector), divide that by 60, and translate the game object using the resulting vector 60 times, once every frame.
In the case of something as uncomplicated as CratePusher, this might well just pass by. However, this method is based on the faulty assumption that each frame is rendered in the same amount of time.
This is definitely not the case in higher-fidelity 3D games, as the number of polygons rendered in the frame heavily influences the rendering time. And even then, in 2D games, operating system interference (such as process pre-emption) can also impact rendering times. Therefore, it’s always best to try and estimate the real time elapsed between frames, and use interpolation and integration techniques in estimating game object positions.
Refactoring commands
With the demand of animated movement comes the need to refactor the command interface, so that we can support animations well. This is what I came up with in the end, after considering various options:
public interface ICommand
{
    bool CanExecute { get; }
    ICollection<ICommand> GetRamifications(Level level);
    void Advance(Level level, TimeSpan elapsedTime);
    void Finish(Level level);
    bool Done { get; }
    void Rollback(Level level);
}
CanExecuteis unchanged — it says whether or not the command is executable.GetRamificationsgets a list of ramifications of the command — that is, commands that are executed indirectly by the given command. For instance, in case ofMovePlayerCommand, this list will contain aMoveCrateCommandinstance.Advanceis like a partialExecute— if the action takes non-zero time, this method advances its execution by a bit.elapsedTimeis the amount of time passed since the last command update.Finishis used to make sure that the state of the level is correct. This method is mostly used to make sure that once the animation executes fully, the objects moved are positiond exactly at their destinations. It is mostly a safety net, since now I’m dealing with floating-point numbers, and you can pretty much never be too careful with those.- The
Doneproperty indicates that the action is finished. This will come in handy a bit later. - The
Rollbackcommand is unchanged. I considered making rollbacks non-instantaneous, but doing so would be exactly analogous to theAdvancemethod, so I am omitting this matter from further deliberations.
Now that I’ve given a high-level description, let’s look at an example: moving the player with the new and improved MovePlayerCommand.
GetRamificationssays that if there is a crate, it should be moved:
public ICollection<ICommand> GetRamifications(Level level)
{
    var commands = new List<ICommand>();
    if (level.Crates.Contains(destinationPoint))
    {
        commands.Add(new MoveCrateCommand(level, inputAction, destinationPoint));
    }
    return commands;
}
Advanceperforms the heavy animation lifting. Using the initial and final player positions, the method linearly interpolates the position in the given frame, using the time elapsed since the animation start:
private static readonly TimeSpan AnimationDuration = CratePusher.AnimationDuration; // defined to be 300ms

public void Advance(Level level, TimeSpan elapsedTime)
{
    this.elapsedAnimation += elapsedTime;
    if (elapsedAnimation > AnimationDuration)
    {
        elapsedAnimation = AnimationDuration;
    }

    float t = (float) (elapsedAnimation.TotalMilliseconds / AnimationDuration.TotalMilliseconds);
    level.PlayerPosition = (1 - t) * initialPoint + t * destinationPoint;
    level.PlayerDirection = finalDirection;
}
Finishmakes sure that the player is exactly at the target tile, no fractions allowed:
public void Finish(Level level)
{
    level.PlayerPosition = destinationPoint;
}
- And finally,
Donejust checks the animation duration:
public bool Done => elapsedAnimation >= AnimationDuration;
To make use of the command interface refactoring, major changes were also introduced to the CommandRunner class:
BeginActionis a method used for initiating the command chain. It does not execute anything — it merely checks whether the chain is fully executable, using theGetCommandChainmethod. (GetCommandChainwill returnnullif something goes wrong along the way.)
public void BeginAction(InputAction inputAction, Level level)
{
    var commands = new List<ICommand>();
    switch (inputAction)
    {
        case InputAction.ResetLevel:
            ResetLevel(level);
            return;
        case InputAction.Undo:
            UndoLastCommand(level);
            return;
        case InputAction.MoveLeft:
        case InputAction.MoveRight:
        case InputAction.MoveUp:
        case InputAction.MoveDown:
            commands.Add(new MovePlayerCommand(level, inputAction));
            break;
        case InputAction.None:
            return;
    }
    currentCommands = GetCommandChain(commands, level);
}
-
If there are any commands currently executed,
AdvanceActionupdates them every frame. If all commands have ended, the command chain is cleared and the commands executed are added to the history stack. This is done to prevent undoing unfinished commands.The boolean return value indicates whether or not the action is still executing. It will be used later.
public bool AdvanceAction(Level level, TimeSpan elapsedTime)
{
    if (currentCommands == null) return;
    if (currentCommands.All(command => command.Done))
    {
        foreach (var command in currentCommands)
        {
            command.Finish(level);
        }
        commandHistory.Push(currentCommands);
        currentCommands = null;
        return false;
    }
    foreach (var command in currentCommands)
    {
        command.Advance(level, elapsedTime);
    }
    return true;
}
GetCommandChain, asRunCommandChaindid before, checks the executability of the command chain to its end.
private static List<ICommand> GetCommandChain(List<ICommand> commands, Level level)
{
    if (commands.Any(command => !command.CanExecute))
    {
        return null;
    }

    var nextInChain = commands.SelectMany(command => command.GetRamifications(level)).ToList();
    if (nextInChain.Count == 0)
    {
        return commands;
    }

    var executedChain = GetCommandChain(nextInChain, level);
    if (executedChain != null)
    {
        commands.AddRange(executedChain);
        return commands;
    }
    return null;
}
Sprite cycling
Since commands now take non-zero time, I add in one simple visual enhancement — sprite cycling. Sprite cycling is alternating two or more sprites every few frames to simulate sprite movement. The GIF below demonstrates what sprite cycling looks like:

Cycling just two player sprites can lead to acceptable results, for a small cost.
As was the case with changing player direction, this change only requires additions to the level model and the player movement command and additional support in the renderer. I add an additional integer property to the level model:
public class Level
{
    // ...
    public int PlayerFrameCycle { get; set; }
}
I set its value in the command:
public class MovePlayerCommand : ICommand
{
    public void Advance(Level level, TimeSpan elapsedTime)
    {
        float t = (float) (elapsedAnimation.TotalMilliseconds / AnimationDuration.TotalMilliseconds);
        level.PlayerFrameCycle = (int)(t * 3) % 2;
        // ...
    }
}
Taking (int)(t * 3) % 2 ensures that the value of PlayerFrameCycle is always 0 or 1.
To implement the sprite cycling, we can utilize two facts:
- First, the animation sprites to cycle are next to each other; for example,
PlayerDownWalk1 = 66is next toPlayerDown == 65, - You can perform integral operations on enumeration values.
Therefore, cycling the sprites reduces to a simple addition in the renderer:
private void DrawPlayer(Level level, SpriteBatch spriteBatch, Point offset, int targetTileSize)
{
    var playerLocation = TileToScreen(level.PlayerPosition, targetTileSize, offset);
    switch (level.PlayerDirection)
    {
        case Direction.Left:
            tileSheet.DrawTile(spriteBatch, TileType.PlayerLeft + level.PlayerFrameCycle, playerLocation, targetTileSize);
            break;
        case Direction.Right:
            tileSheet.DrawTile(spriteBatch, TileType.PlayerRight + level.PlayerFrameCycle, playerLocation, targetTileSize);
            break;
        case Direction.Up:
            tileSheet.DrawTile(spriteBatch, TileType.PlayerUp + level.PlayerFrameCycle, playerLocation, targetTileSize);
            break;
        case Direction.Down:
            tileSheet.DrawTile(spriteBatch, TileType.PlayerDown + level.PlayerFrameCycle, playerLocation, targetTileSize);
            break;
    }
}
The end effect looks pretty nice… except, there’s a pretty big problem.
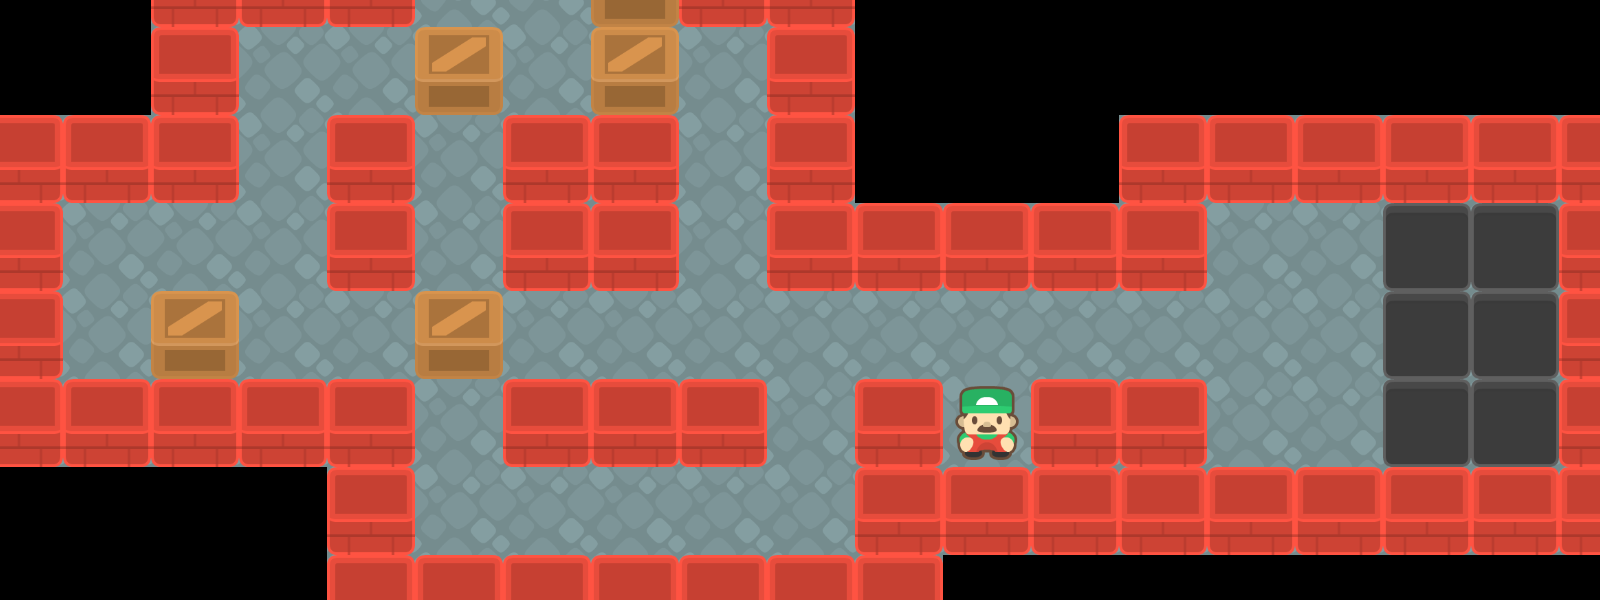
Unfortunately, our factory worker can use a bug we introduced and break free from the level!
As it turns out, in the current state of affairs, the player can break out of the playing field, by performing an action, and then performing another one while the previous one is still executing and animating. This causes the player position to have a fractional part, therefore totally breaking the collision-checking code.
Recall that I used a HashSet of wall tile positions to check whether the player’s new position was in a wall.
However, since walls do not move, they will always have exact and integral positions, so there is no way a fractional position is going to cause a collision with the wall.
Mitigating this issue seems daunting; at this point one might consider implementing a full box collision model. However, in my opinion that is not necessary; the minimal change required to make the animations work is to make sure that at all times one and exactly one animation is executing. A way of doing so is described in the next section, but for now let’s take a step back to reevaluate.
Improving control flow with yet another state machine
Besides fixing the animation bug, I also want to address level transitions. Level changes are very different to normal gameplay, in that there is no player character logic to be executed and no input to process. Solving the animation problem will also require reworks to the control flow of the game.
Addressing both issues could lead to very messy code very quickly, so it is important to reevaluate the control flow of the game. Seeing that in the future I might also want to implement menus, it seems wise to introduce another, higher-level state machine, that will handle scene transitions. For now I discern two scenes:
- The gameplay scene, in which the player is solving a level.
- The level transition scene, in which the level transition plays. No input is processed, no puzzle logic is executed.

The state machine used for scene transitions.
Both states of our state machine will use our existing components, which at the time of writing are:
LevelCollection, representing game data,LevelRenderer, responsible for visual presentation,InputStateManager, responsible for interpreting player input,CommandExecutor, responsible for executing player actions.
I can encapsulate all those in the states, and expose them using this minimal state interface:
public interface ISceneState
{
    ISceneState Advance(TimeSpan elapsedTime);
    void DrawScene(SpriteBatch spriteBatch);
}
Advanceperforms game state updates and returns the next state. (As before, the state instance is allowed to return itself — this represents remaining in the current state.)DrawSceneencapsulates the scene rendering, using theSpriteBatchsupplied to draw on the screen.
As always, if there’s a State, there’s also a Manager — but this one is mainly delegating:
public class SceneStateManager
{
    private readonly LevelCollection levelCollection;
    private readonly LevelRenderer levelRenderer;

    private ISceneState sceneState;

    public SceneStateManager(LevelCollection levelCollection, LevelRenderer levelRenderer)
    {
        this.levelCollection = levelCollection;
        this.levelRenderer = levelRenderer;
        this.sceneState = new GameplayState(levelCollection, levelRenderer);
    }

    public void Advance(TimeSpan timeSpan)
    {
        sceneState = sceneState.Advance(timeSpan);
    }

    public void DrawScene(SpriteBatch spriteBatch)
    {
        sceneState.DrawScene(spriteBatch);
    }
}
I haven’t shown you GameplayState yet, but for good reason — first let’s go back to fixing my nasty bug by talking about input buffering.
Fixing animations with input buffering
Input buffering is a technique used to handle rapid player inputs to execute events that take a long amount of time to execute. The simplest way to think of the input buffer is that player inputs are queued, and executed fully in the order of arrival. That means that if an action is requested during execution of another one, it will not begin before the previous one has ended.
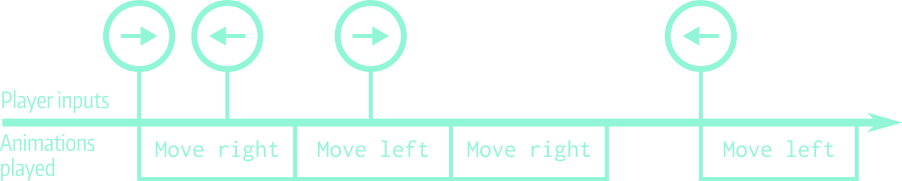
A visual explanation of input buffering. User inputs are depicted above the timeline, and their animation duration is represented by the boxes below the line.
Thankfully, the queue data structure with its FIFO (First In, First Out) ordering is precisely what we need to add input buffering to the mix.
Here’s how it looks in theory in GameplayState:
public class GameplayState : ISceneState
{
    private readonly LevelCollection levelCollection;
    private readonly CommandRunner commandRunner;
    private readonly LevelRenderer levelRenderer;

    private readonly InputStateManager inputStateManager;
    private readonly Queue<InputAction> inputBuffer;

    public GameplayState(LevelCollection levelCollection, LevelRenderer levelRenderer)
    {
        this.levelCollection = levelCollection;
        this.levelRenderer = levelRenderer;
        this.commandRunner = new CommandRunner();
        this.inputStateManager = new InputStateManager();
        this.inputBuffer = new Queue<InputAction>();
    }

    public ISceneState Advance(TimeSpan elapsedTime)
    {
        if (levelCollection.ShouldChangeLevel())
        {
            return new LevelTransitionState(levelCollection, levelRenderer); // start transition
        }

        var input = inputStateManager.Advance(elapsedTime);
        if (input != InputAction.None)
        {
            inputBuffer.Enqueue(input); // buffer this input
        }

        if (commandRunner.AdvanceAction(levelCollection.CurrentLevel, elapsedTime) // action in progress
            || inputBuffer.Count == 0) // no actions queued
        {
            // early return
            return this;
        }

        // process next input from queue
        var nextInput = inputBuffer.Dequeue();
        commandRunner.BeginAction(nextInput, levelCollection.CurrentLevel);
        commandRunner.AdvanceAction(levelCollection.CurrentLevel, elapsedTime);
        return this;
    }

    public void DrawScene(SpriteBatch spriteBatch)
    {
        levelRenderer.Render(levelCollection.CurrentLevel, spriteBatch);
    }
The input buffering takes place in the Advance method.
- Non-empty inputs are added to the queue.
- Three scenarios can arise:
- The command runner is still executing an action. In that case, advance the action being executed and continue.
- The command runner has finished executing an action and the buffer is empty. In that case, simply continue.
- The command runner has finished executing an action and the buffer is not empty. In that case, begin the action (checking whether it is executable at the same time), and then advance it.
Here’s how it looks in practice:
Demonstration of input buffering. Note how at the end the keyboard input stop way before the player character stops moving.
Note: Input buffering vs. animation duration In my implementation I made sure that the animation duration was equal to the time between keypress registrations when holding down the arrow keys. Because both values are equal, holding down the key does not result in actions being queued; they are executed sequentially. Due to this, when the arrow key is released, the character stops as soon as the last animation started is finished.
If I had set the keypress repeat time to be less than the animation time, the repeated actions would queue up and the animations would lag behind badly. This is obviously bad for the user experience, as them releasing the button wouldn’t cause the expected effect of the player character stopping.
Level transition
The transition state is the last missing piece of the state machine puzzle. In this state, all I care about is the time elapsed and the preset transition time. Here’s the annotated code for the state.
public class LevelTransitionState : ISceneState
{
    private readonly LevelCollection levelCollection;
    private readonly LevelRenderer levelRenderer;
    private readonly TimeSpan TransitionTime = TimeSpan.FromSeconds(2);

    private TimeSpan totalTime;
    private bool levelChanged;

    public LevelTransitionState(LevelCollection levelCollection, LevelRenderer levelRenderer)
    {
        this.levelCollection = levelCollection;
        this.levelRenderer = levelRenderer;
    }

    public ISceneState Advance(TimeSpan elapsedTime)
    {
        totalTime += elapsedTime;
        if (totalTime >= TransitionTime + TransitionTime)
        {
            // transition ended, back to gameplay
            return new GameplayState(levelCollection, levelRenderer);
        }
        if (totalTime >= TransitionTime && !levelChanged)
        {
            // half of transition done and level hasn't changed, change it now
            levelCollection.ChangeLevel();
            levelChanged = true;
        }
        return this;
    }

    public void DrawScene(SpriteBatch spriteBatch)
    {
        // linear interpolation for the intermediate level position
        var transitionPoint = 1 - Math.Abs(totalTime.TotalMilliseconds / TransitionTime.TotalMilliseconds - 1);
        levelRenderer.Render(levelCollection.CurrentLevel, spriteBatch, transitionPoint);
    }
}
A careful read-through reveals the addition of the transitionPoint parameter to the levelRenderer.Render call.
I added a helper method in the renderer to take care of moving the level as a whole for me:
private void CalculateTileSizeAndOffset(Level level, out int targetTileSize, out Point offset)
{
    var targetWidth = level.Width * TileSheet.TileSize;
    var targetHeight = level.Height * TileSheet.TileSize;
    targetTileSize = GetTileSize(targetWidth, targetHeight);
    if (targetTileSize != TileSheet.TileSize)
    {
        targetWidth = level.Width * targetTileSize;
        targetHeight = level.Height * targetTileSize;
    }

    offset = new Point((screenWidth - targetWidth) / 2, (screenHeight - targetHeight) / 2);
}

public void Render(Level level, SpriteBatch spriteBatch)
{
    CalculateTileSizeAndOffset(level, out var targetTileSize, out var offset);
    DrawLevelGrid(level, spriteBatch, offset, targetTileSize);
}

public void Render(Level level, SpriteBatch spriteBatch, double transitionPoint)
{
    CalculateTileSizeAndOffset(level, out var targetTileSize, out var offset);
    offset.Y -= (int) (screenHeight * transitionPoint);
    DrawLevelGrid(level, spriteBatch, offset, targetTileSize);
}
The extra parameter only modulates the Y coordinate level offset, to make the level move up and down while transitioning.
Note:
CalculateTileSizeAndOffsetwas previously part of theRenderfunction, but as the code was common for bothRenderoverloads, I extracted it out to be extra DRY.
Animation curves
At this point the game looks way better, but there’s a last tidbit I want to add to push it a little bit further; namely, the introduction of animation curves.
Animation curves are used to determine the results of the interpolation process. While linear interpolation results in a steady, constant pace of movement, there are noticeable start and stopping points, that look a little bit odd. It is also very hard to judge from a linear animation, how far away it is from completion. For instance, compare the two following curves:
The two-dimensional plots are representations of the actual animation curves. You can interpret the X axis as time, and the Y axis as the position of the object whose movement is being interpolated. To give you a better view of the dynamics of the position change, I added the vertical bars with circles, to visualize the movement along the Y axis.
The left version uses linear interpolation, while the right one uses a cubic Bézier curve. Because of the mathematical properties of cubic functions, there is a noticeable acceleration of the circle in the first phase of movement, and deceleration in the second phase. (This maps directly to the concept of derivatives.)
It is of course a subjective judgement as to which option is better, but I think for the purposes of the game the cubic function is a good middle ground between the abruptness of the early versions and the animation smoothness of the linear version. While still smooth, the cubic curve clearly accents the beginning and end of the movement. The above curve will be used for the player character.
As far as the level transitions are concerned, I opted for the right curve shown below:
Compared to the curve on the left, the right one gives a “bouncy” effect. The circle starts slow and accelerates rapidly; exactly in the middle of the curve there is a nadir (that’s where the level will change), and then the circle comes back fast and slows down.
I put the animation curves together in a helper class:
public static class AnimationCurves
{
    public static float Fade(float t)
    {
        if (t > 0.5f) t -= 1;
        return 4 * t * t;
    }

    public static float Movement(float t)
    {
        return t < 0.5f
            ? 2 * t * t
            : 1 - 2 * (t - 1) * (t - 1);
    }
}
Using them is as simple as calling the functions on the linearly interpolated values we used so far, and using their return values for position calculation:
public class LevelTransitionState : ISceneState
{
    public void DrawScene(SpriteBatch spriteBatch)
    {
        float t = (float) (totalTime.TotalMilliseconds / (2 * TransitionTime.TotalMilliseconds));
        float tt = AnimationCurves.Fade(t);
        levelRenderer.Render(levelCollection.CurrentLevel, spriteBatch, tt);
    }
}
Finally, to summarize the above efforts, here’s a comparison video:
A bird’s eye view on CratePusher
In my eyes I have reached a milestone with CratePusher, wherein the core gameplay is pretty much as good as I’d like it to be. At this point I would like to review the overall architecture of the game.
I have changed the control flow of the game several times, so at this point it is important to make sure that inter-object dependencies are sound. Introducing complex or cyclical dependencies is obviously bad and requires immediate intervention, especially in a project this small.
To have a look at the architectural state of the project, I made the diagram below to illustrate the most important dependencies. Things that are obviously non-problematic (such as state machine states, enumeration types, levels) have been omitted for brevity.
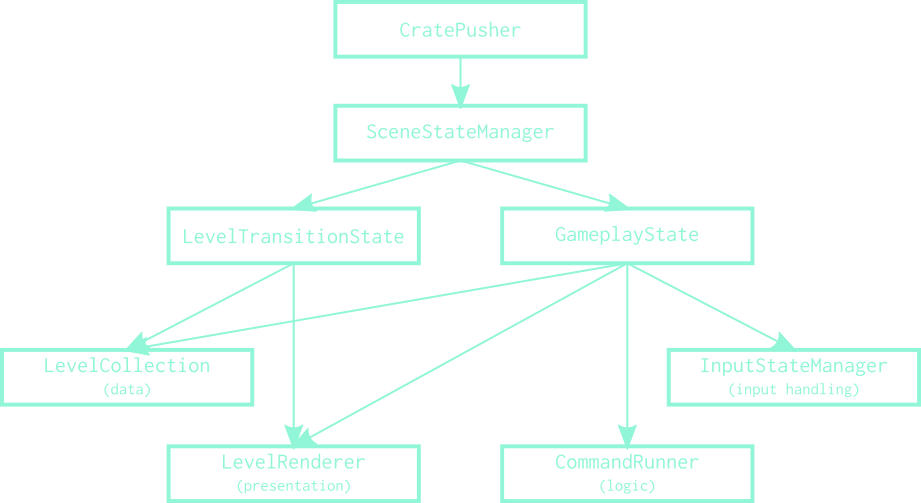
The general hierarchy of components in CratePusher developed so far. Note the separation of concerns in the bottom-most layer.
Overall, it seems that the project is in a decent shape. The dependency graph is acyclic, and has distinguished layers, which is a good sign. A very healthy sign is the separation of concerns in the four components at the bottom-most layer. Note that each of those performs a different role, and therefore they do not interfere in each other’s domains. This is extremely important both for future extensibility and maintainability.
What’s next?
As I’m pretty satisfied with the gameplay itself, it is probably time to direct my time and efforts into UI to fully finish off this project. However I might opt for small improvements, such as making rollbacks non-instantaneous as well, but they will probably be omitted from the following blog posts.
While preparing this post there were a fair few structural changes in the project, so it is very likely I skipped over some changes in an effort to keep this post to a reasonable length. As always, the full story is available in my GitHub repository. Thanks for reading (if you still are), and until next time, which will hopefully be soon!