Continuing from where the first part left off, I describe the process of adding proper keyboard input support and implementing the game logic, while touching on some topics that might seem wholly unrelated, such as finite state automata and transactional data models. By the end of this post I will be able to present a “minimal viable product” of sorts!
Handling keyboard input
Manual handling of keyboard input is not often done during development of programs with graphical user interfaces. In this case programmers will usually utilise ready-made libraries or frameworks to process keypresses for them, and wrap them into abstractions that are easier to handle, such as event-based models.
Video games are a bit of a different beast — game developers will often want to have as much control over the input handling as possible, as the feel of the game is heavily influenced by its response to the user’s keypresses. The framework I am using to develop CratePusher, MonoGame, exposes a relatively low-level interface; pretty much all I can do is check whether a key has been pressed or not.
The behaviour I am looking to implement is as follows:
- Pressing any one of the arrow keys should obviously result in the input being registered.
- If the player holds the key down, the input should be repeated with a set interval between repeats.
- Pressing multiple allowed keys presents an issue, as it is not clear which input should be performed. In this case I will just block any further inputs until the player releases all keys.
Thankfully, there is one abstraction that fits perfectly into the above requirements — the finite state machine.
Finite state machines
Finite state machines, also called finite state automata, can appear very scary at first when reading their definition. Terms such as abstract machine or computational model might suggest that the finite state machine is a construct that has only theoretical applications. It is definitely not the case; aside from their usage in compilers in the process of lexical analysis, they are also extremely convenient when creating applications with non-trivial input schemes.
At the core of finite state machines, are the notions of state and transition function. The machine can be only in one state at a time. In our case, the states translate naturally from our behaviour specification:
- One state,
Idle, is required for the case where no keys are being pressed. This will be the state our game starts in. - One state,
ButtonDown, is required for the case where exactly one key is being pressed. Here we will check that no further keys have been pressed by the user, and perform the automatic repeat functionality. - The final state,
Blocked, will be used in case several keys have been pressed simultaneously and inputs need to be blocked.
The transition function specifies when the state machine is permitted to change state.
For instance, when the machine is in the Blocked state, it can only transition out of it into the Idle state if and only if the user has released all of the keys currently pressed.
The state machine neatly maps onto the concept of a graph. The boxes (vertices) of the graph below represent the states, and the arrows (directed edges) show the transitions between states. The edges are annotated with the conditions that need to be met for the transition to take place.
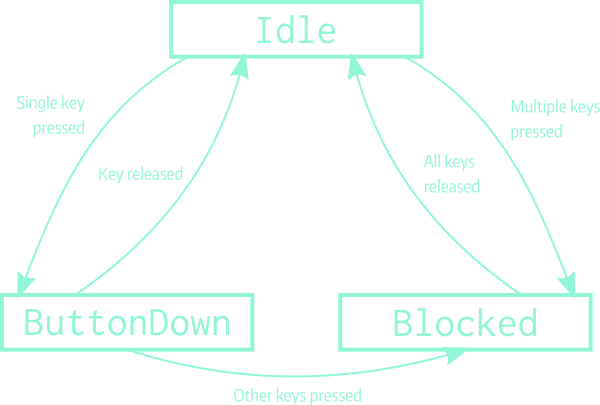
The state machine diagram for keyboard input handling.
Of course, a state machine is not necessary for implementing the kind of behaviour I specified earlier. However, it is in my opinion the most elegant way of doing so. The need to distinguish states and transitions between them compartmentalises the input logic very well and helps to avoid the nightmare of several nested conditional statements.
In case the description above was unclear or lacking, I strongly recommend the chapter about state machines from Robert Nystrom’s “Game Programming Patterns”, which you can read online.
Implementation
Before starting the madness, let’s just define a simple enumeration type for all the actions the user should be able to perform in game:
public enum InputAction
{
    None = 0,
    MoveLeft,
    MoveRight,
    MoveUp,
    MoveDown
}
Having done that, I will also add a helper class, used to translate keypresses into input actions. This might come in very handy at some point in the future, if I decide I want to let the user remap their keys as they see fit.
public class KeyBindings
{
    private static readonly Dictionary<Keys, InputAction> KeyboardBindings = new Dictionary<Keys, InputAction>
    {
        {Keys.Left,  InputAction.MoveLeft},
        {Keys.Right, InputAction.MoveRight},
        {Keys.Down,  InputAction.MoveDown},
        {Keys.Up,    InputAction.MoveUp}
    };

    public static InputAction GetBinding(Keys key)
    {
        KeyboardBindings.TryGetValue(key, out var action);
        return action;
    }

    public static HashSet<Keys> GetPressedKeys()
    {
        var keyboardState = Keyboard.GetState();
        return new HashSet<Keys>(KeyboardBindings.Keys.Where(key => keyboardState.IsKeyDown(key)));
    }
}
The GetBinding method tries to get an input action for the supplied key.
If there is no match in the KeyboardBindings dictionary, InputAction.None will be returned.
The other method, GetPressedKeys, checks whether there are any bound keys that have been pressed and returns them as a set.
Now we’ve defined all possible actions and mapped them onto keys, we can move onto the meat of the problem. To implement the FSM, I will begin with defining the interface for a single state. All states will map onto separate classes.
public interface IState
{
    IState Advance(TimeSpan elapsedTime);
    InputAction GetInputAction();
}
- The
Advancemethod will do the transition function work. In other words, each state will tell the caller of this method, what the next state should be. Of course, the state does not need to change — the state class instances can just return themselves. - The
GetInputActionmethod will return the next input action to perform. The reason this is its own separate method is to support the auto-repeat functionality when exactly one key has been pressed.
Now let’s move to our implementations:
public class IdleState : IState
{
    public IState Advance(TimeSpan elapsedTime)
    {
        var keysPressed = KeyBindings.GetPressedKeys();
        switch (keysPressed.Count)
        {
            case 0:
                return this;
            case 1:
                return new ButtonDownState(keysPressed.Single());
            default:
                return new BlockedState();
        }
    }

    public InputAction GetInputAction()
    {
        return InputAction.None;
    }
}
In the Idle state, there are no pressed keys, and therefore no input action can ever be performed.
The Advance method specifies precisely what we aimed to do — if the input is unambiguous, the machine moves to the ButtonDown state; otherwise all inputs are blocked.
public class ButtonDownState : IState
{
    private static readonly TimeSpan RepeatInterval = TimeSpan.FromMilliseconds(300);

    private readonly Keys keyPressed;
    private TimeSpan lastRepeat;

    public ButtonDownState(Keys keyPressed)
    {
        this.keyPressed = keyPressed;
        this.lastRepeat = RepeatInterval; // to trigger the first movement immediately
    }

    public IState Advance(TimeSpan elapsedTime)
    {
        var keysPressed = KeyBindings.GetPressedKeys();
        if (!keysPressed.Contains(keyPressed))
        {
            return new IdleState();
        }
        if (keysPressed.Count > 1)
        {
            return new BlockedState();
        }
        lastRepeat += elapsedTime;
        return this;
    }

    public InputAction GetInputAction()
    {
        if (lastRepeat < RepeatInterval)
        {
            return InputAction.None;
        }
        lastRepeat = TimeSpan.Zero;
        return KeyBindings.GetBinding(keyPressed);
    }
}
The ButtonDownState is probably the most complicated one of them all.
In the constructor, I save the keypress that was registered when the machine entered this state.
Additionally, there is a lastRepeat field.
Its purpose is to register the time elapsed since the last time an input was emitted from this state.
The Advance method does two things:
- It checks for changes in the pressed keys.
If the key associated with this state has been released, we move to the
Idlestate. If there are multiple keys pressed, the inputs are blocked. - Additionally, if there is no change in state, the
lastRepeatcounter is updated.
In the GetInputAction() method, I check the lastRepeat value.
If the time since the input was last repeated is longer than the predetermined interval, I repeat the action and reset the counter.
Otherwise, no action is performed.
public class BlockedState : IState
{
    public IState Advance(TimeSpan elapsedTime)
    {
        var keysPressed = KeyBindings.GetPressedKeys();
        if (keysPressed.Count > 0)
        {
            return this;
        }
        return new IdleState();
    }

    public InputAction GetInputAction()
    {
        return InputAction.None;
    }
}
The Blocked state is very simple; the automaton just stays in the same state until all keys are released and never emits any input action.
To bring these all states together, we will use a simple wrapper class:
public class StateManager
{
    private IState currentState;

    public StateManager()
    {
        currentState = new IdleState();
    }

    public InputAction Advance(TimeSpan elapsedTime)
    {
        currentState = currentState.Advance(elapsedTime);
        return currentState.GetInputAction();
    }
}
The main purpose of this class is to hide the transitions from the caller, providing a unified and simplified interface. The manager performs the transition specified by the current state, asks the updated state whether or not to perform an action, and returns it to the caller.
The following video demonstrates the machine in action (without crate/wall collision checking):
Working exactly as intended! The FSM translates keyboard inputs into the desired logical actions. Now I can finally move onto getting the gameplay to work.
Aside: Instantiated vs. static states Notice that I am instantiating new instances of states during every state change. I could have chosen to use exactly one instance of each state. However, I am not very fond of singletons and static instances — they tend to cause problems, as sometimes bits of leftover state from a previous transition can stay behind and cause nasty and hard to debug errors.
In a more performance-demanding application, I might opt to compromise and use a static instance or an object pool, but in this case, there is no need to complicate matters. The C# garbage collector should manage, as the objects instantiated here are tiny and should hardly have a big memory footprint, and framerate should never be a problem with a 2D grid-based game such as CratePusher.
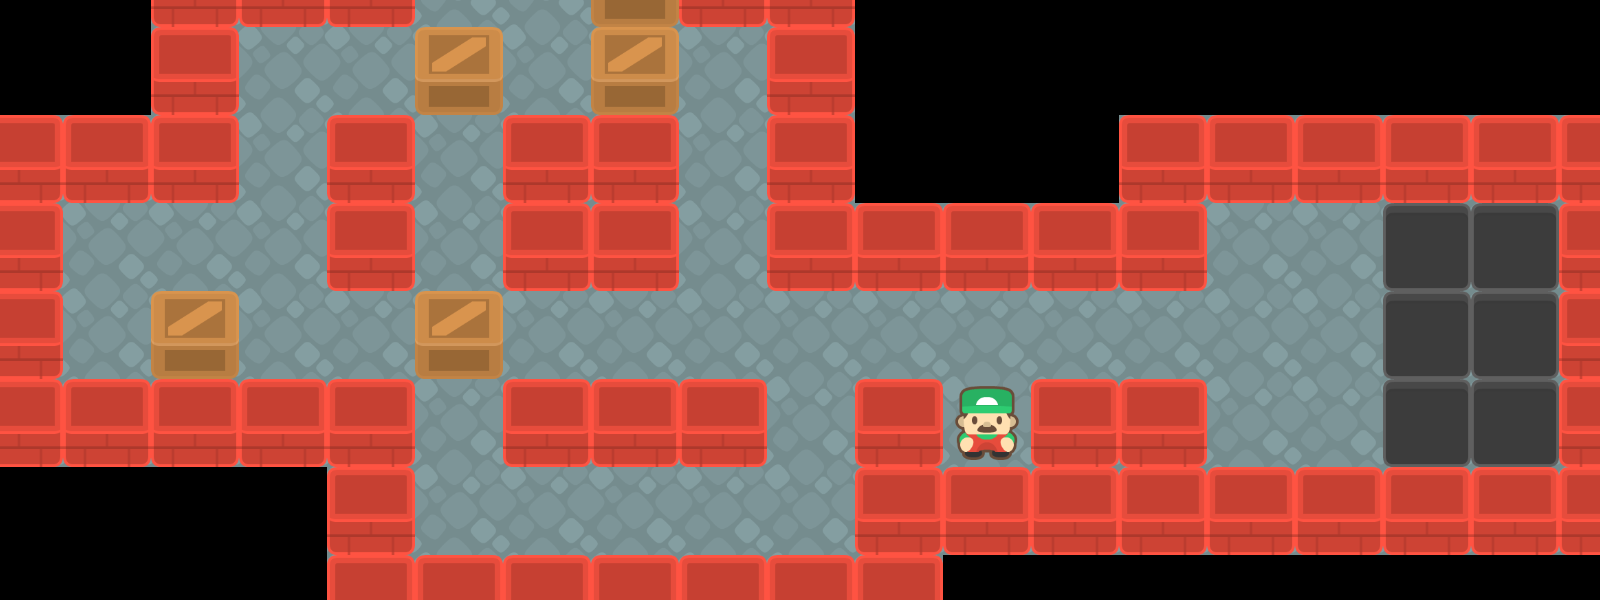
Implementing the game logic
Player actions in Sokoban have relatively simple ramifications. The factory worker can move around the level and move single blocks; however, there are a couple of edge cases that need to be handled.
- For one, the player cannot step into the walls.
- I need to make sure it is not possible to push blocks onto or along with other blocks, as well as push blocks into walls and out of the level bounds.
We can split every player action at this stage into two parts: moving the player, and (potentially) moving the block. The important thing that the actions cannot be partially executed — the move either succeeds fully, or is never performed. This requirement is called atomicity and is very frequent in the computer science world.
The diagram below depicts the steps necessary to decide, whether a player input can be successfully executed. The ellipsoid nodes represent potential results of the action, while the square ones determine the final result of the action.
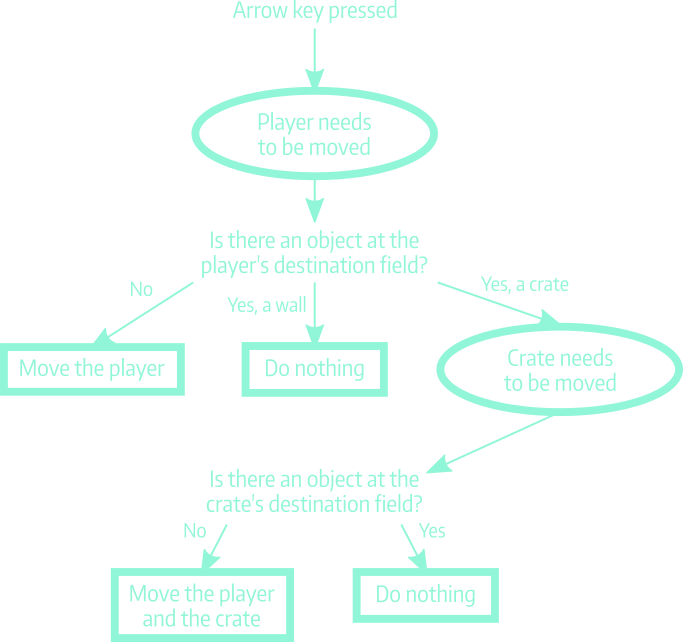
The basic action logic of Sokoban.
Preparation work
Before I begin, I need to rectify some of the makeshift choices made in the first part of this series.
Rendering the level works well, but I need to rework the Level class, as well as the renderer, to avoid trouble when implementing the game logic.
In the previous post, I was not yet concerned with the semantics of each tile — the level data was contained in two two-dimensional arrays: one for the floor behind all tiles, and one for the other tiles (the walls, crates, goals and player character). This choice is convenient for rendering, but not so much for the actual gameplay implementation. Some elements, such as the player and crates, should move, while the other ones, should not. Therefore I decided to change the level representation to a more layered model:
public bool[,] Floor { get; }
public HashSet<Point> Walls { get; }
public HashSet<Point> Goals { get; }
public HashSet<Point> Crates { get; }
public Point PlayerPosition { get; set; }

public int Width => Floor.GetLength(1);
public int Height => Floor.GetLength(0);

public Level(IList<string> rows)
{
    var height = rows.Count;
    var width = rows.Select(r => r.Length).Max();

    Floor = new bool[height, width];
    Walls = new HashSet<Point>();
    Goals = new HashSet<Point>();
    Crates = new HashSet<Point>();

    Point? initialPosition = null;
    for (int y = 0; y < height; ++y)
    {
        var line = rows[y];
        for (int x = 0; x < line.Length; ++x)
        {
            switch (line[x])
            {
                case '#':
                    Walls.Add(new Point(x, y));
                    Floor[y, x] = true;
                    break;
                case '$':
                    Crates.Add(new Point(x, y));
                    break;
                case '.':
                    Goals.Add(new Point(x, y));
                    break;
                case '@':
                    initialPosition = new Point(x, y);
                    break;
            }
        }
    }
    if (!initialPosition.HasValue)
    {
        throw new ArgumentException("No player in level");
    }
    PlayerPosition = initialPosition.Value;
    FloodFillFloor(initialPosition.Value);
}

public bool InBounds(Point point)
{
    return point.X >= 0 && point.X < Width &&
           point.Y >= 0 && point.Y < Height;
}
Every tile type is now separated into its own data structure.
The Floor is still represented as a two-dimensional array, since it is the most convenient data structure for performing the flood-fill algorithm from the first post.
All the other tile types have now been separated into homogenous collections (HashSets, to be more precise).
This will allow me to perform easy layering of all the level components.
These changes in the Level class of course require a follow-up in the LevelRenderer:
private void DrawLevelGrid(Level level, SpriteBatch spriteBatch, Point offset, int targetTileSize)
{
    DrawFloor(level, spriteBatch, offset, targetTileSize);
    DrawLayer(level.Walls, spriteBatch, offset, targetTileSize, TileType.RedWall);
    DrawLayer(level.Goals, spriteBatch, offset, targetTileSize, TileType.TargetField);
    DrawLayer(level.Crates, spriteBatch, offset, targetTileSize, TileType.YellowCrate);

    var playerLocation = TileToScreen(level.PlayerPosition, targetTileSize, offset);
    tileSheet.DrawTile(spriteBatch, TileType.PlayerFacingDown, playerLocation, targetTileSize);
}

private void DrawLayer(HashSet<Point> points, SpriteBatch spriteBatch, Point offset, int targetTileSize, TileType tileType)
{
    foreach (var point in points)
    {
        var targetPoint = TileToScreen(point, targetTileSize, offset);
        tileSheet.DrawTile(spriteBatch, tileType, targetPoint, targetTileSize);
    }
}

private void DrawFloor(Level level, SpriteBatch spriteBatch, Point offset, int targetTileSize)
{
    for (int y = 0; y < level.Height; ++y)
    {
        for (int x = 0; x < level.Width; ++x)
        {
            var location = new Point(x * targetTileSize, y * targetTileSize) + offset;
            if (level.Floor[y, x])
            {
                tileSheet.DrawTile(spriteBatch, TileType.GrayFloor, location, targetTileSize);
            }
        }
    }
}

private static Point TileToScreen(Point position, int targetTileSize, Point offset)
{
    return new Point(position.X * targetTileSize, position.Y * targetTileSize) + offset;
}
The layering is fully apparent here. First I draw the floor, then the immutable walls and goals, then the movable crates, and I finish up with drawing the player character itself. With this adjustment, I can continue with the implementation.
Modeling the player interactions
The interaction graph shown earlier is simple enough that I probably could have got away with implementing the level logic using conditional statements only. However, I have opted for yet another abstraction, and the reason for that will become apparent by the end of this post.
My chosen abstraction will represent a chain of commands:
- A command can be executable or not in a given level state.
- If the command is executable, performing it may require other commands to be executed.
- If the other commands are not executable, the original commands need to be undone.
I will represent these requirements in the following interface:
public interface ICommand
{
    bool CanExecute { get; }
    ICollection<ICommand> Execute(Level level);
    void Rollback(Level level);
}
CanExecuteis an immutable property, telling the caller whether or not this command can be executed.Executeperforms the command on the level supplied, and returns a collection of child commands, which are consequences of the original command.Rollbackreverts the effects of the command, restoring the level state before the command was executed.
The important part is that the Execute and Rollback methods should be idempotent, which essentially means that every time you execute a command and then roll it back, the resulting level state should be exactly the same, as the initial level state.
Now we’ve got our interface, let’s have a look at its implementations.
public class MovePlayerCommand : ICommand
{
    private readonly Point initialPoint;
    private readonly Point destinationPoint;
    private readonly InputAction inputAction;

    public bool CanExecute { get; }

    internal MovePlayerCommand(Level level, InputAction inputAction)
    {
        this.initialPoint = level.PlayerPosition;
        this.destinationPoint = level.PlayerPosition;
        this.inputAction = inputAction;
        switch (inputAction)
        {
            case InputAction.MoveLeft:
                destinationPoint.X -= 1;
                break;
            case InputAction.MoveRight:
                destinationPoint.X += 1;
                break;
            case InputAction.MoveUp:
                destinationPoint.Y -= 1;
                break;
            case InputAction.MoveDown:
                destinationPoint.Y += 1;
                break;
        }
        CanExecute = level.InBounds(destinationPoint) &&
                     !level.Walls.Contains(destinationPoint);
    }
    public ICollection<ICommand> Execute(Level level)
    {
        level.PlayerPosition = destinationPoint;
        var commands = new List<ICommand>();
        if (level.Crates.Contains(destinationPoint))
        {
            commands.Add(new MoveCrateCommand(level, inputAction, destinationPoint));
        }
        return commands;
    }

    public void Rollback(Level level)
    {
        level.PlayerPosition = initialPoint;
    }
}
The first command is responsible for moving the player. In the constructor, depending on the type of input registered, I calculate the desired target coordinates of the player sprite on the level grid. The command is executable if and only if the destination point is inside of the level bounds and there is no wall at the destination point.
Executing the command moves the player to the destination point.
If the destination field does not have a crate on it, this ends the command chain; in the other case I invoke the MoveCrateCommand to take care of the crate.
Notice that this abstraction model also compartmentalizes the logic quite well. In the above class, I am only concerned with the player’s movement — there is no code checking if the crates can be moved further.
public class MoveCrateCommand : ICommand
{
    private readonly Point initialPoint;
    private readonly Point destinationPoint;

    public bool CanExecute { get; }

    internal MoveCrateCommand(Level level, InputAction inputAction, Point initialPoint)
    {
        this.initialPoint = initialPoint;
        this.destinationPoint = initialPoint;
        switch (inputAction)
        {
            case InputAction.MoveLeft:
                destinationPoint.X -= 1;
                break;
            case InputAction.MoveRight:
                destinationPoint.X += 1;
                break;
            case InputAction.MoveUp:
                destinationPoint.Y -= 1;
                break;
            case InputAction.MoveDown:
                destinationPoint.Y += 1;
                break;
        }
        CanExecute = level.InBounds(destinationPoint) &&
                     !level.Walls.Contains(destinationPoint) &&
                     !level.Crates.Contains(destinationPoint);
    }

    public ICollection<ICommand> Execute(Level level)
    {
        level.Crates.Remove(initialPoint);
        level.Crates.Add(destinationPoint);
        return new ICommand[0];
    }

    public void Rollback(Level level)
    {
        level.Crates.Remove(destinationPoint);
        level.Crates.Add(initialPoint);
    }
}
Moving the crates is extremely similar conceptually.
The command is executable if the target tile for the crate is inside level bounds and not a wall or crate.
The Execute method moves the crate into its destination field and terminates the command chain by returning an empty array of commands, while the Rollback method reverts the change.
As was the case with the finite state machine, I also need something to run the above commands. The following class handles the logic of executing the commands and rolling them back if the pipeline fails.
public class CommandRunner
{
    public void RunCommandsForAction(InputAction inputAction, Level level)
    {
        var commands = new List<ICommand>();
        switch (inputAction)
        {
            case InputAction.MoveLeft:
            case InputAction.MoveRight:
            case InputAction.MoveUp:
            case InputAction.MoveDown:
                commands.Add(new MovePlayerCommand(level, inputAction));
                break;
        }
        RunCommandChain(commands, level);
    }

    private static List<ICommand> RunCommandChain(List<ICommand> commands, Level level)
    {
        if (commands.Any(command => !command.CanExecute))
        {
            // one of the commands is not executable - no need to continue further
            return null;
        }
        // collect all actions which are next in the chain
        var nextInChain = commands.SelectMany(command => command.Execute(level)).ToList();
        if (nextInChain.Count == 0)
        {
            // nothing to execute - chain successfully completed
            return commands;
        }
        // execute the next commands
        var executedChain = RunCommandChain(nextInChain, level);
        if (executedChain != null)
        {
            // chained commands succeeded - add them to our collection and return them back
            commands.AddRange(executedChain);
            return commands;
        }
        // chained commands failed - undo changes
        foreach (var command in commands)
        {
            command.Rollback(level);
        }
        return null;
    }
}
The RunCommandChain method carries the heavy load in properly handling the actions and their effects.
The function returns null if no actions were performed; in the other case the list returned contains all of the commands performed in the chain.
While the code snippet might be tricky to parse, especially for people not entirely comfortable with the concept of recursion, the operations are quite elementary when described in natural language:
- If one of the commands we need to perform is not executable, I abort the command chain, since I cannot execute it to its end.
- If all commands are executable, I perform them and collect all commands that should follow them.
- I use the function recursively to check if the commands collected in step 2. can be executed.
- If they are, I receive a list containing all of the commands that were performed further down in the chain. In this case I add the commands performed in step 2. to the list and return it.
- If not, the function returns
null. In this case I undo the effects of commands executed in step 2. and returnnullagain, since the chain could not be executed.
Warning: Recursion I am aware that this kind of logic code would probably not fly in a performance-intensive game. I am also aware of the fact that if the command chains got a bit too long, I could start getting stack overflow errors. The choice I have made here is a trade-off between performance and correctness. The transactional model I have assumed lets me express the consequences of each action in a very simple manner.
Aside: Transactions Atomic operations and transactional models are deeply connected with classic relational databases, used in the bulk of enterprise applications. To minimize the chance data loss in case of component failure or power outage, database transactions aim to provide atomicity, consistency, isolation and durability.
Undoing last move and resetting the level (almost) for free
While the command model described in the previous section could well be considered as a case of overengineering, it yields me a significant win with very little effort. Namely, the fact that the commands are reversible allow me to efficiently implement move undoing and level resetting with pretty much no cost involved.
Being able to undo a wrong move is especially important in a puzzle game such as CratePusher, as not to frustrate the player with having to start from scratch every time they accidentally make a wrong move. Resetting the level to its initial state is also quite easy — it is equivalent to undoing all of the player’s moves.
I begin with specifying the key bindings for the actions and defining new input actions:
public enum InputAction
{
    None = 0,
    MoveLeft,
    MoveRight,
    MoveUp,
    MoveDown,
    Undo,
    ResetLevel
}

private static readonly Dictionary<Keys, InputAction> KeyboardBindings = new Dictionary<Keys, InputAction>
{
    {Keys.Left,  InputAction.MoveLeft},
    {Keys.Right, InputAction.MoveRight},
    {Keys.Down,  InputAction.MoveDown},
    {Keys.Up,    InputAction.MoveUp},
    {Keys.U,     InputAction.Undo},
    {Keys.R,     InputAction.ResetLevel}
};
This is enough for our state machine to pick up the new inputs and handle them the same way arrow keys were.
Notice how huge a win this is — once the state machine is in place, adding new input actions is pretty much declarative.
Now it’s time to modify CommandRunner to undo the player’s command on demand.
As it turns out, the stack is a very convenient data structure to implement the undo command.
Notice that when a series of items is pushed onto the stack, using the pop method returns them in the reversed order, which is pretty much what I want to do here — first I want to revert the most recent move, then the move before it, and so on.
public class CommandRunner
{
    private readonly Stack<List<ICommand>> commandHistory;

    public CommandRunner()
    {
        commandHistory = new Stack<List<ICommand>>();
    }

    public void RunCommandsForAction(InputAction inputAction, Level level)
    {
        var commands = new List<ICommand>();
        switch (inputAction)
        {
            case InputAction.ResetLevel:
                ResetLevel(level);
                return;
            case InputAction.Undo:
                UndoLastCommand(level);
                return;
            case InputAction.MoveLeft:
            case InputAction.MoveRight:
            case InputAction.MoveUp:
            case InputAction.MoveDown:
                commands.Add(new MovePlayerCommand(level, inputAction));
                break;
        }
        var executedCommands = RunCommandChain(commands, level);
        if (executedCommands?.Count > 0)
        {
            commandHistory.Push(executedCommands);
        }
    }

    // RunCommandChain omitted

    private void UndoLastCommand(Level level)
    {
        if (commandHistory.Count == 0) return;
        var lastAction = commandHistory.Pop();
        foreach (var command in lastAction)
        {
            command.Rollback(level);
        }
    }

    private void ResetLevel(Level level)
    {
        foreach (var action in commandHistory)
        {
            foreach (var command in action)
            {
                command.Rollback(level);
            }
        }
        ClearHistory();
    }

    public void ClearHistory()
    {
        commandHistory.Clear();
    }
}
When the command runner is initialised, it starts with an empty command history stack. Every group of commands that is successfully performed after every valid user input is pushed onto the stack. Undoing the last user input is equivalent to popping the last list of commands off the stack and rolling back every constituent command, while resetting the level reverts all executed commands and clears the stack.
Aside: Deltas versus snapshots In the strategy above, the stack keeps a history of moves performed and tracks the changes in the game state after each move. This is often called the delta or diff method — only the changes between states are tracked.
An alternative solution would be to create a copy of the state of the level before the move, and then save it on the stack. This is the snapshot strategy — we take a snapshot of the current state of the program and save it for later.
Choosing between the two methods is yet another trade-off. The snapshot method is easier to implement and is reliable (the only thing that I would have to do is to substitute the old level state back), but is less space-efficient; notice that I would have to maintain a copy of the level for each move the player has made. On the other side, the delta method is more efficient, but is prone to failure in case of bugs — if undoing a move doesn’t quite do what it’s supposed to, undoing the moves preceding it could completely wreck the state of the game.
Checking win conditions
At this stage I can freely move around the levels and move crates correctly. However, there is one key part still missing — we need to check whether or not the level has been completed.
Thankfully, in the preparation stage I have sneaked one change in the Level class that will make this check essentially trivial.
Notice that I introduced the Goals and Crates sets, which track the locations of the goals and crates in the level.
The HashSet class exposes a SetEquals method, which checks whether the two sets have the exact same elements (and better yet, it does so in linear time).
Checking whether the player has moved all crates onto goals reduces into calling the SetEquals method as follows:
public bool LevelDone()
{
    return Goals.SetEquals(Crates);
}
Aside: Time complexity When I say that the comparison of two sets occurs in linear time, what I mean is that the number of operations performed by the computer to check whether the sets are equal is asymptotically bounded by the number of elements in the first set, multiplied by some constant. (The asymptotically term means that the bound might not be correct for small sizes of the first set, but when the size is large enough, the bound will be true.)
The analysis of time complexity of algorithms is a rich and complex field. I wouldn’t dare to try and recap any of it, but suffice to say that there are problems which are solvable easily, and problems which are very hard to always solve precisely.
Keeping the time complexity low results in efficient code, and in cases like the above one, all that I had to do was choose the appropriate data structure. For instance, if I had opted to keep lists of goal and crate locations, I would potentially have to check each pair of items from both lists to determine whether all the crates are on their fields. This results in a quadratic time complexity, which means that the number of operations performed is asymptotically bounded by the square of the number of elements in the first set.
Now, let’s modify LevelCollection a little bit to handle switching levels in the collection for me:
public class LevelCollection
{
    public List<Level> Levels { get; }
    public Level CurrentLevel => Levels[levelNumber];
    private int levelNumber;

    public LevelCollection()
    {
        Levels = new List<Level>();
        levelNumber = 0;
    }

    public bool LevelChanged()
    {
        if (!CurrentLevel.LevelDone() || levelNumber >= Levels.Count)
        {
            return false;
        }
        levelNumber += 1;
        return true;
    }
}
The LevelChanged method is used to check win conditions.
If the current level is not done or there are no more levels, the collection does nothing; in the opposite case, it moves onto the next level.
And now, with all components in place, time to modify our main game loop and run!
private readonly StateManager stateManager;
private readonly CommandRunner commandRunner;

protected override void Update(GameTime gameTime)
{
    if (GamePad.GetState(PlayerIndex.One).Buttons.Back == ButtonState.Pressed || Keyboard.GetState().IsKeyDown(Keys.Escape))
        Exit();

    var action = stateManager.Advance(gameTime.ElapsedGameTime);
    commandRunner.RunCommandsForAction(action, levelCollection.CurrentLevel);
    if (levelCollection.LevelChanged())
    {
        commandRunner.ClearHistory();
    }

    base.Update(gameTime);
}
- First off, I use the state machine to check whether there is an action to be performed.
- I then pass the action to the command runner, which does its job on the current level.
- After the commands are completed (or reverted), I check the win conditions in the level using the
LevelChangedmethod and move onto the next level. If the level has changed, we need to clear the command runner’s history, so that we don’t undo moves from the previous level in the new one.
Running this code results in a fully playable Sokoban clone! The video below demonstrates a single level being completed.
What’s next?
I’ve got my minimal viable product, but I am not yet satisfied with the state of this project. One particular gripe I have with the current state of affairs is the appearance and feel of the game. There are no animations or transitions right now, so the game feels quite janky at times — the sudden transition between levels feels particularly jarring. There’s also a distinct lack of a main menu or other useful functionalities, such as a scoreboard or move counter.
I will be tackling all of the above issues in the near future. In the mean time, thank you for reading — if you enjoyed it, I will be back soon enough with more! As usual, my code is available at the CratePusher repository.